MOBILAIR M 17 portable compressor
Short instructions for operation and maintenance
The operating videos and short instructions presented in this page are for supplementary references only.
The operating and handling instructions as laid down in the KAESER operating manuals remain in full force and effect. When applying the operating instructions presented in this page full compliance with all national safety and environmental regulations is mandatory.
The operating videos and short instructions presented in this page are copyright protected intellectual property of KAESER Kompressoren SE. The Unlawful use of the materials from the page, e.g. reproduction, distribution, communication to the public or making available to the public is solely permitted with the prior written consent of the proprietor. Any copyright violation may result in civil and criminal penalties.
DANGER
Risk of force being exerted on the body due to sudden release of pressure
- Disconnect compressed air consumers.
- Switch the machine off and wait for 2 minutes until it has vented automatically.
- Slowly open the compressed air discharge valve until the pressure gauge reads 0.
- Ensure that all pressurised components and enclosures are fully vented.
- Only use compressed air hoses that correspond to the permissible maximum pressure.
DANGER
Danger of impact from open compressed air hoses
- Do not pressurise open compressed air hoses.
- Connect a compressed air consumer before pressurising.
- Only decouple unpressurised hoses.
- Secure compressed air hoses to the discharge valve using a wire cable.
Starting and switching off the machine
Before each machine start, make sure that the machine is in a clean condition.
Following transportation, make sure that the fuel valve is open. Do not use cold-start fluid. To start up the drive engine, turn the ignition key rightwards for no longer than 5 seconds. Should the drive engine fail to start, turn the ignition key back to the 0 position and wait for 10 seconds before trying again. Do not turn the ignition key to the right whilst the engine is running.
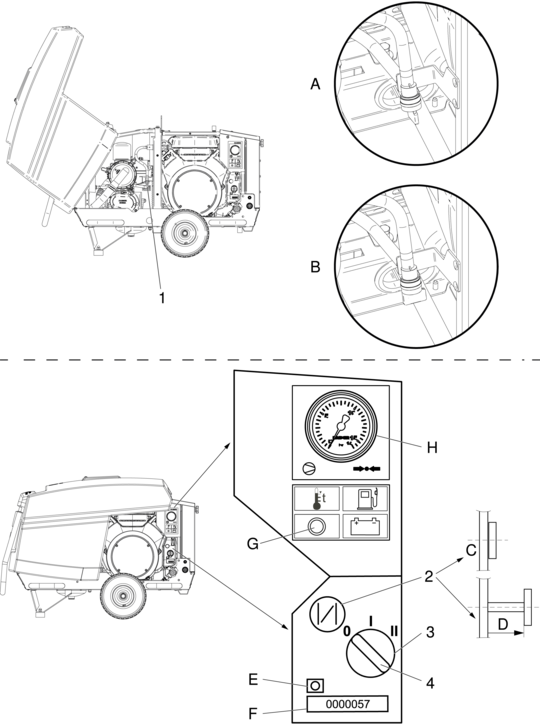
C - Cold-starter inactive

Proceed as follows:
- Open the enclosure.
- Open the fuel valve 1.
- Ensure that the bodywork and all covers are closed.
- Make sure that no consumers are connected and the compressed air discharge valve is open.
- Insert the ignition key 4 into the ignition starter lock 3.
- Pull out the cold-starter knob 2.
- Turn the ignition key rightwards to position I
- The status indicator light E illuminates. - Turn the ignition key rightwards to position II; hold it, and release it as soon as the drive engine starts
- The ignition key remains in position I, the status indicator lights goes out. - As soon as the drive engine runs evenly, push the cold-starter knob slowly back in.
- Close the compressed air discharge valve.
- Allow the machine to run in IDLE for 3-5 minutes.
- Connect a consumer and open the compressed air discharge valve
- The machine switches to load and begins to generate compressed air. - Close the compressed air discharge valve to stop the machine generating compressed air.
- Allow the machine to run in IDLE for 15-20 seconds.
- Turn the ignition key leftwards to position 0.
The machine shuts down automatically as soon as the airend discharge temperature rises above the permissible limit value. The fault is indicated by the status indicator light. Wait until the machine has cooled down before restarting.
The longer the compressed air hoses, the more the compressed air cools down. As the compressed air cools, it releases moisture that can damage compressed air tools. Use short compressed air hoses in order to keep condensate formation to a minimum.
- Check fuel tank level and top up if necessary.
- Check the petrol tap and open it if necessary.
- Engine is not getting any air, therefore check the air filter.
- Engine starter does not turn, please charge the battery.
- Check whether the bonnets and doors of the system are closed during operation.
- Check the installation conditions such as distance to walls or similar.
- Check fluid levels (compressor oil).
- Clean the radiator.
- If necessary, disable the tool lubricant.
- Check compressor oil level for overfilling.
- Apply correct switch-off procedure, unload machine (idling mode) and then switch off.
- With filter combination option: is the condensate drain regularly drained?
- With filter combination option: condensate drain regularly drained?
- Too low machine usage.
| Maintenance intervals
M 13 - M 50* |
Service kit
A 250 h / every year |
Service kit
B 1,000 h / 2 years |
Service kit
C 1,500 h / 3 years |
Service kit
D 3,000 h / 6 years |
| Engine filter SET | x | x | x | x |
| Engine oil | x | x | x | x |
| Compressed air treatment (optional) | x | x | x | x |
| Filter SET (includes Engine Filter SET) | x | x | ||
| Compressor oil | x | x | ||
| Dirt trap | x | x | ||
| Oil separator cartridge | x | x | ||
| Antifreeze | x | x | ||
| Engine belt | x | x |